

In this article, I will show you the 3D printing procedure for the original garage kit "Ayukawa Hiyori".
The contents are useful for tips on printing many parts with a 3D printer and how to print decals.
Contents
- 3D Printing Procedure
- Decal printing procedure
- Downloadable garage kits will increase
3D Printing Procedure
The contents of the "Ayukawa Hiyori" downloadable files are as below.

STL with support
These are STL files with support materials. You can 3D print the parts by simply importing them into your slicer software and slicing them.
STL without support
These are STL files without support materials. Use this files when printing does not go well even if you use the files with support materials. You need to attach the support materials by yourself.
Decal
These are PDF files for decal printing. You can make the decals by printing them on
commercially available decal paper.
read me.htm
This is a simple instruction manual.
parts_list.pdf
Flow of 3D Printing
- Importing STL Files into Slicing Software
- Slicing
- Printing
I will explain in detail in each order.
(1) Open the folder

Open "STL with support" folder. It contains a total of 32 STL files.
(2)Import STL files

Launch your slicing software and drag and drop the STL files into it. In this article, I will use the free software Chitubox to explain the process. For importing STL files, follow the operation instructions of your slicing software.
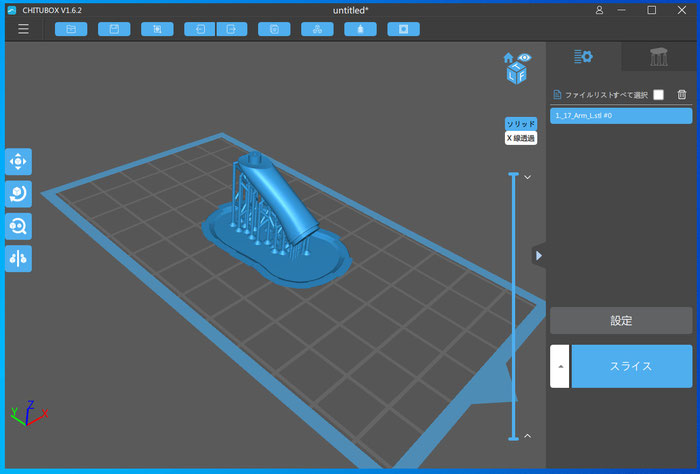
The STL has been imported. It's very easy because it comes with supports (thin rods that support the parts) and a raft (base). Import more and more until the print area is full.
(3) Arrange the parts in the printing area.

The STL files were imported over the entire printing area.
There is no problem at all if the rafts of other parts overlap each other. Rather, overlapping and integrating the rafts will make it easier for the molding to stick to the build plate, which will greatly increase the printing success rate. It is also very effective in reducing the time required for printing.

This is a not so good example.
There is a waste of space and it is better to place the parts as densely as possible to prevent them from falling off the build plate. Some slicing software may not be able to overlap rafts, so in that case, use this placement method.
(4) Slicing

Check the entire image and if there are no problems, set the layer height, exposure time, etc. and run the slice. Roughly speaking, slicing is the process of translating complex modeling data into a language that a 3D printer can understand.
The exposure time will depend on the printer and resin you are using, so use your preferred settings.

This is an example of parts placement.
Parts number 01-05. It is okay if the raft extends beyond the printing area.

Parts number 06-08.

Parts number 09-17.

Parts number 18-32.
The printable range varies depending on the printer you are using, so try to print as much as possible at once.
When modeling fails

If you experience problems such as the parts falling off or distorted shapes during printing, try reattaching the support materials using the files in the "STL without support" folder. In some cases, this can be solved by increasing the size of the raft and adding more support material.
(5) Printing

After the sliced data is ready, transfer it to your 3D printer and print it.
The method of transferring data depends on your printer (USB or Wi-Fi), so follow the printer's operating instructions.
(6) Wash the parts

After printing is complete, wash off the uncured resin from the parts. The cleaning method varies depending on your resin.
(7) Remove the support materials
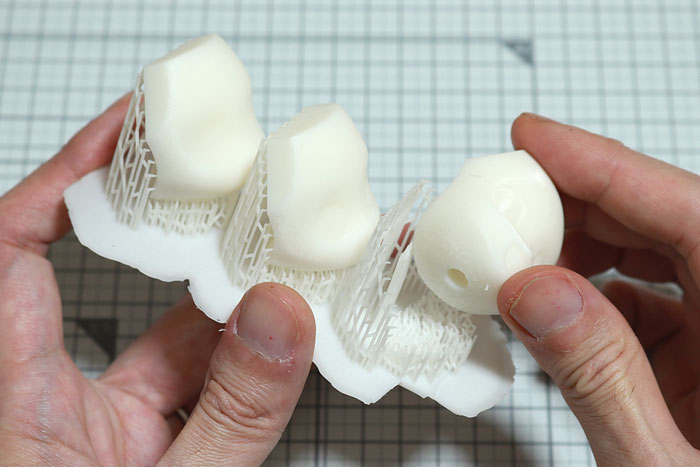
Remove the parts from the support materials before curing. Before they are fully cured, the support materials are very soft and can be easily removed by hand. I recommend to remove the supports before curing, as it takes a lot of time to remove them after they have completely cured.
Wash off the uncured resin around the support marks and allow the parts to dry.
(7)Curing

The parts just printed by a 3D printer are soft and have a sticky surface, so you need cure them using sunlight or a UV LED. This process is called curing.
To be honest, I'm not sure how long it takes to cure, as it depends on the resin you are using, the shape of the part, and the weather or the UV LED. It is OK when the surface is no longer sticky and feels smooth to the touch.
(8) Leave them for a few days and wait for the color to change

The curing process is complete when it is browned like the one in the middle.
"...Oi! it is yellow! It's not white!" You may be surprised when you first see it, but it will naturally return to white after about three to four days. I think it depends on the types of resin, but ELEGOO and SK Honpo water-washable resins that I've used turn yellowish violently and then return to a slightly yellowish white.
You may be thinking, "I have to wait three days after printing?" but you can sand or paint them right after curing. However, if you are painting the skin tone with the Clear Skin Tone Method, it is safer to wait 3-4 days for the color to change because it will be affected by the color of the resin.
Tools used, settings, etc.
These are the tools and settings I use to make "Ayukawa Hiyori" resin kit version.
You don't need to have all of the items listed here, but it's just for reference.
3D printer: ELEGOO MARS PRO
Slicer : Chitubox
Resin: SK Honpo Water Washable Resin White
UV LED: UV resin curing light 405nm
Layer height: 0.05mm
Bottom Exposure time: 60 seconds
Exposure time: 8 seconds
Decal printing procedure
(1) Open the folder

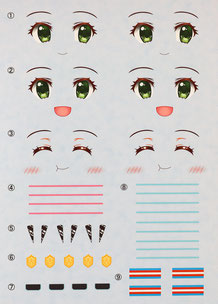
The "Decal" folder contains three PDF files.
- Hiyori(1) Decal_1.pdf "A file containing all decals"
- Hiyori(1) Decal_2.pdf "Decals suitable for transparent decal paper"
- Hiyori(1) Decal_3.pdf "Decals suitable for white decal paper"
There are two types of decal paper on the market: transparent and white.
The transparent paper is suitable for decals that are difficult to cut out, such as eyebrows and eyelashes, while white is suitable for others.
(2) Printing

Print the decals on your printer according to the instructions on the decal paper.
Recommended Decal Paper

This decal paper allows you to make decals (water slide marks) with a home inkjet printer. The thickness is very thin and adheres well to the curved surface of the part. The size is large (A4), so it is easy to use if you cut it into 4 pieces (postcard size).
After printing, it is necessary to dry it well and protect it with gloss clear, which takes some getting used to. When coat it with gloss clear, I recommend that you use Rapid Thinner that does not bleed printing.

This is not a decal, but it is a paper that you can make stickers. It's a little thicker than decals, but it's a great product, very easy to handle and the print is beautiful.
The transparent film adheres well to curved surfaces, making it very easy to use as an eye decal. The only disadvantage is that the transparent part turns white when it is matted.

I put stickers made of transparent film on the part and then matted them.
The left eye have been roughly cut. The right eye have been carefully cut out between the eyelashes and the whites of the eyes.
You can see that the margin of the left eye is noticeably white.The right eye, carefully cut out, is very nicely done. On the other hand, you can use the whitening process to make the whites of the eyes.

You can cut out the margins of the sticker even after you have applied the sticker. Be sure to work with a new, well-cut blade.

Unfortunately, when using the storage label (transparent film), it is not possible to reproduce the cheeks of the Taiyaki face due to the thickness of the sticker and the whitening phenomenon. When using this product, paint the cheeks with Enamel Pink and Weathering Master(H).

The storage labels (matte paper) cannot be clear coated, so apply them last after the parts are painted and matted. I recommend the product because it is much easier to apply and handle than decals.
There are also decal papers that you can print on a laser printer, such as Hi-Q Parts Clear Decal TH and Fine Mold White Decal Set, although I have never used them. Unlike the decal paper for inkjet, you don't need to clear coat it, and they say it is easy to handle.
If you cannot print decals
If you can't find the decal paper or are not satisfied with the quality, please consider purchasing the decals from my BOOTH. This is a high quality decal made by Hi-Q Print, so if you feel that "this is a quicker way to go considering the cost of materials and effort", please take a look at my BOOTH.
You can find the painting tips for "Ayukawa Hiyori" in the following article.

Downloadable garage kits will increase

Finally, I would like to talk about my predictions for the near future of garage kits.
I think that downloadable garage kits will increase and become more common in the near future. A downloadable garage kit is an idea that everyone will think of at one time or another, and there are a few people who are already selling their original downloadable garage kits.
However, I think the reason why so many people come up with this idea but so few do it is because of the following factors.
- 3D printers are not widely used by general modelers
- Cannot sell copyrighted products
- High risk of unauthorized copying
It would take too long to explain all of them, so I will briefly talk about the first one.
How to popularize 3D printing among general modelers
A 3D printer is basically a special kind of machine that only people who are into 3D modeling as a hobby or job, such as sculptors, have.
It may seem that 3D printers will never be popular among general modelers who enjoy assembling and painting kits, but I think that they will explode in popularity if certain conditions are met.
Let's use a video game console as an example.
When a new video game console is released, it will be difficult to buy an expensive console if there is only one game software you want to play. But what if you have five or ten games you want to play? Or what if a major blue-chip manufacturer such as SQUARE ENIX or BANDAI NAMCO decides to enter the market?
The willingness of prospective customers to purchase the game console will increase dramatically, and the hardware will become more popular. In fact, game hardware manufacturers in the past have had a history of fighting over how to acquire popular software and good manufacturers.
I think the same thing applies to 3D printers.
In other words, if there are a lot of attractive downloadable garage kits on the market, 3D printers will spread as a "way to get garage kits".
It will still take time for more sculptors to enter the market of downloadable garage kits, and we need to provide solutions for the remaining two items: "Cannot sell copyrighted items" and "High risk of unauthorized copying".
Due to time constraints, I can't introduce them this time, but I'll be posting the rest on Twitter, Youtube and my blog, so if you find it interesting, It would be great if you could follow me.
I, MASKED MODELER, dream of a "world where people all over the world can easily enjoy garage kits". The original character "Ayukawa Hiyori" was born as my partner to create the future. I will continue to provide downloadable garage kits, so I would be grateful if you could support me!


Ayukawa Hiyori
An energetic girl who strives to become a professional modeler.
As long as she can build models, she is happy every day.
She loves to nibble on the mold lines of Taiyaki.


コメントをお書きください